API Access Tokens
API Access Tokens enable secure, programmatic access to Quapp Functions without requiring interactive login. They are designed for developers who want to integrate Quapp into external systems, automation workflows, backend services, or CI/CD pipelines.
Each access token is scoped to a specific project and specific functions, ensuring controlled and auditable access.
What is an API Access Token?
An API Access Token is a credential that allows your application to:
- Invoke Quapp Functions via REST APIs
- Submit quantum jobs programmatically
- Query job execution results
- Integrate Quapp into external systems
Tokens are project-scoped, permission-based, and revocable.
Token Ownership and Permissions
API Access Tokens can only be created by Project Admins
Each token is associated with:
- A single project
- One or more selected functions
- An optional expiration date
Tokens cannot access functions outside their assigned scope
This design ensures that API access follows the same security and permission model as the Quapp UI.
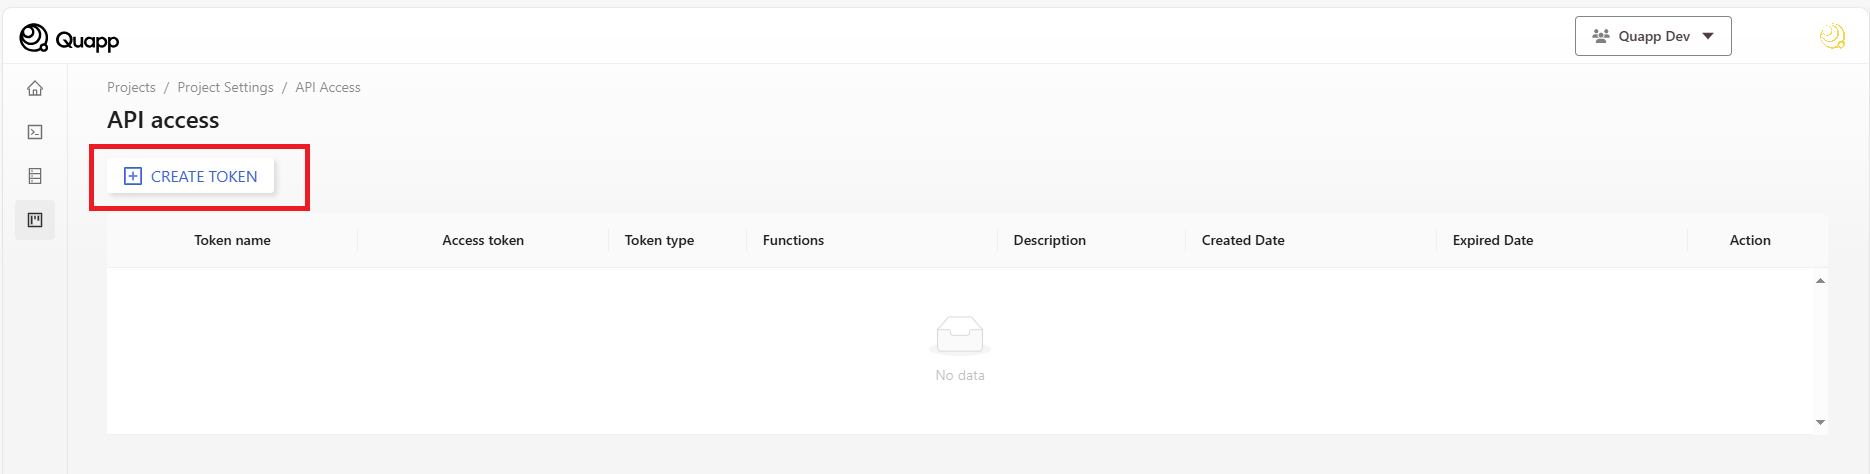
How to create access token
Log in to your account. Select the project that will create the token, then go to the Project Settings screen. → Choose API Access (Your account must be a project admin)

On the API Access screen -> select Create Token
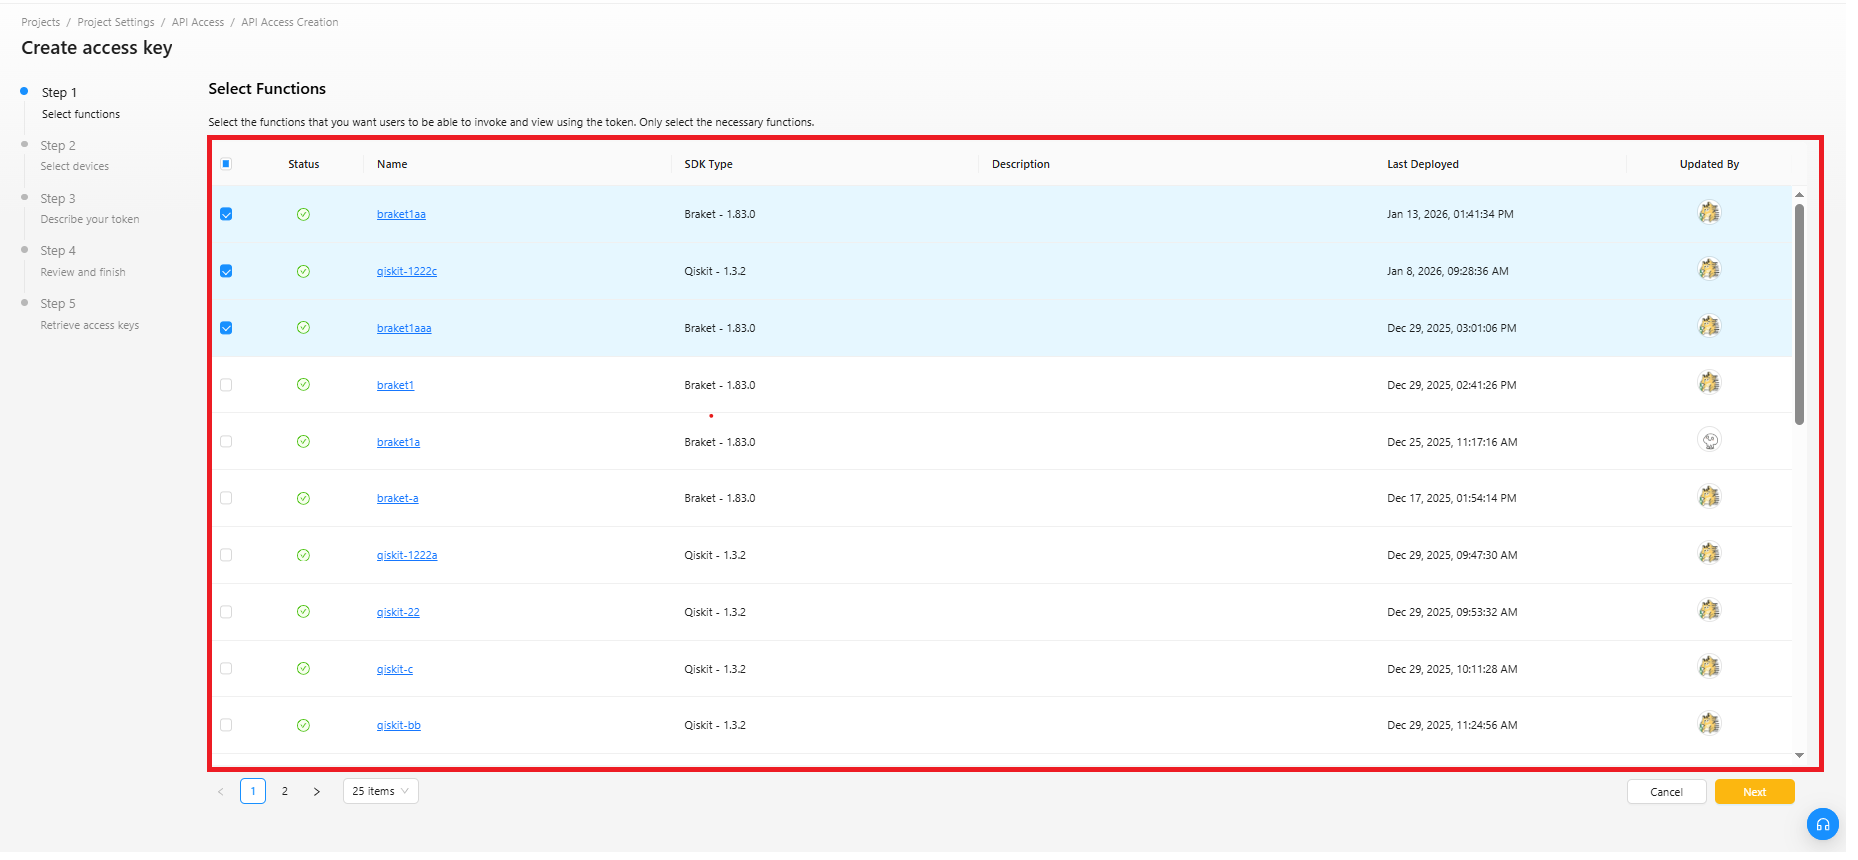
"Create Access Key": The interface is part of a multi-step process, as indicated on the left-hand side
Step 1: Select Functions
Select Functions: Choose one or more functions from the Functions Table by selecting the checkboxes.
Click Next.
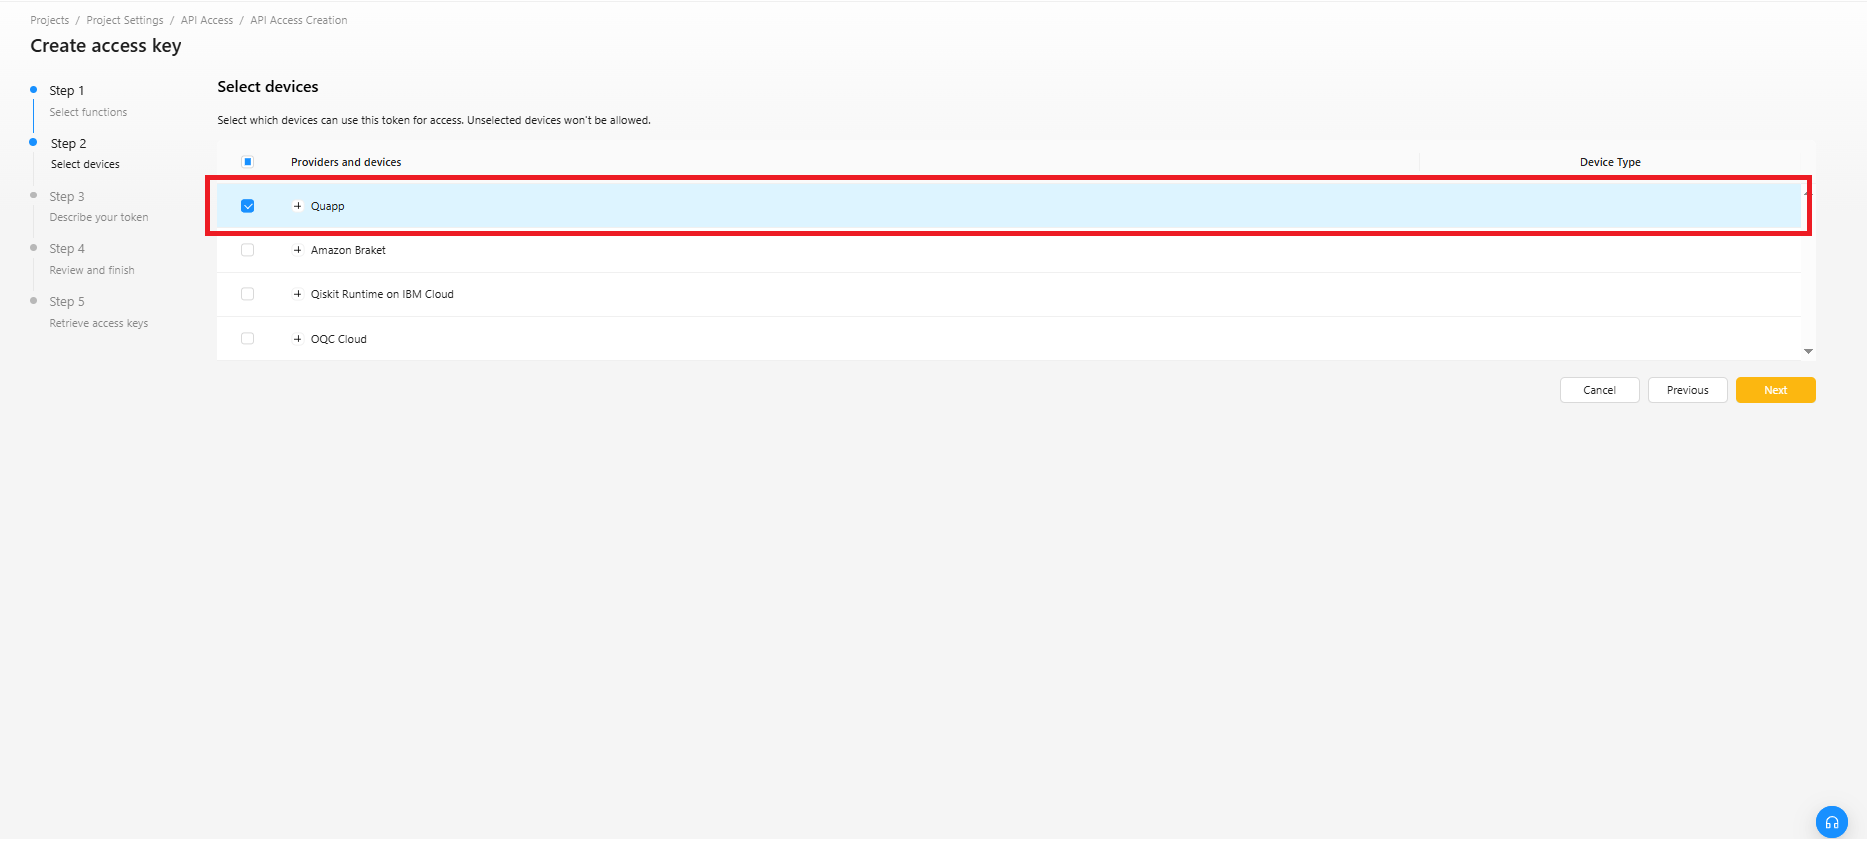
Step 2: Select devices
Select devices: Choose one or more devices from the Devices Table by selecting the checkboxes
Click Next.
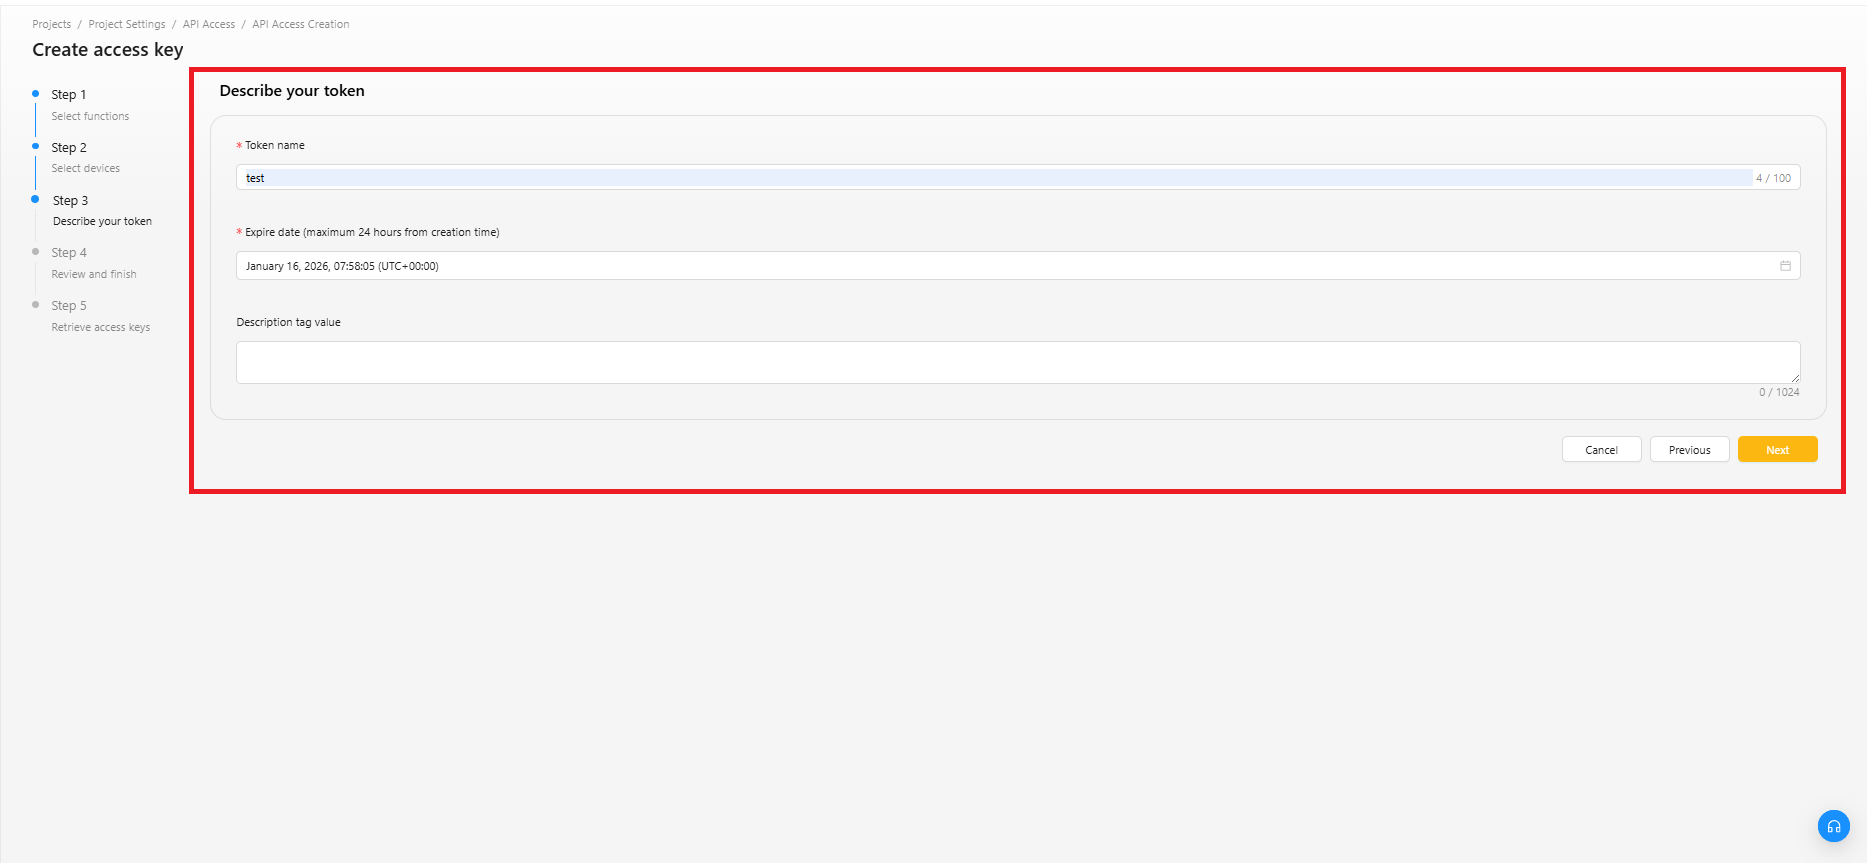
Step 3: Describe your token
- Token Name: A text input field to define the name of the token.
- Expire Date: A date picker to set an expiration date for the token.
- Description tag value : Describe the purpose of this access key and where it will be used. A good description will help you rotate this access key confidently later.
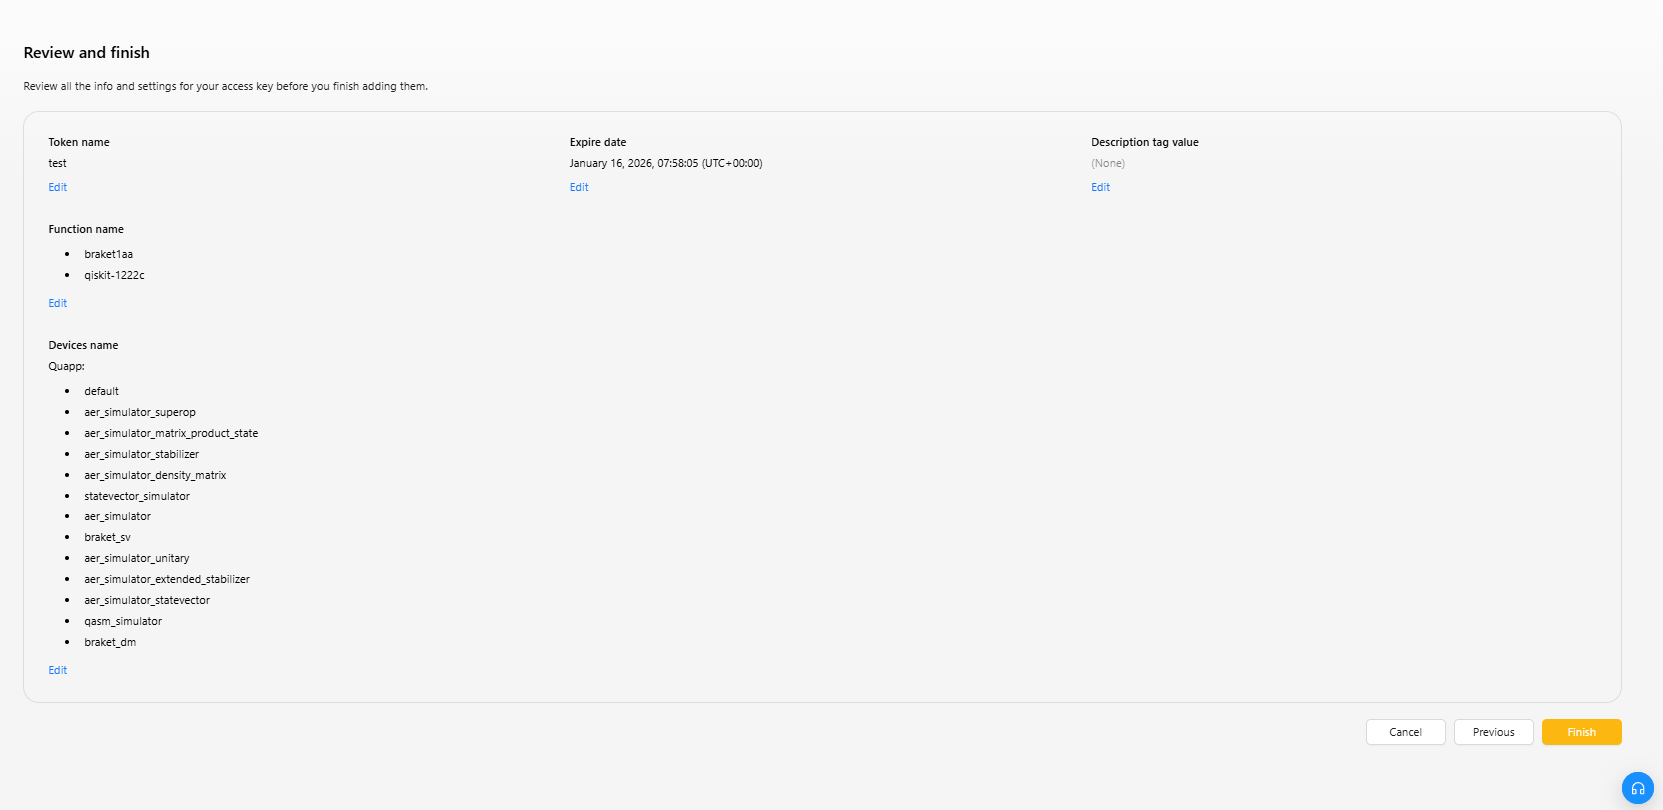
Step 4: Review and finish
Review all the info and settings for your access key before you finish adding them.
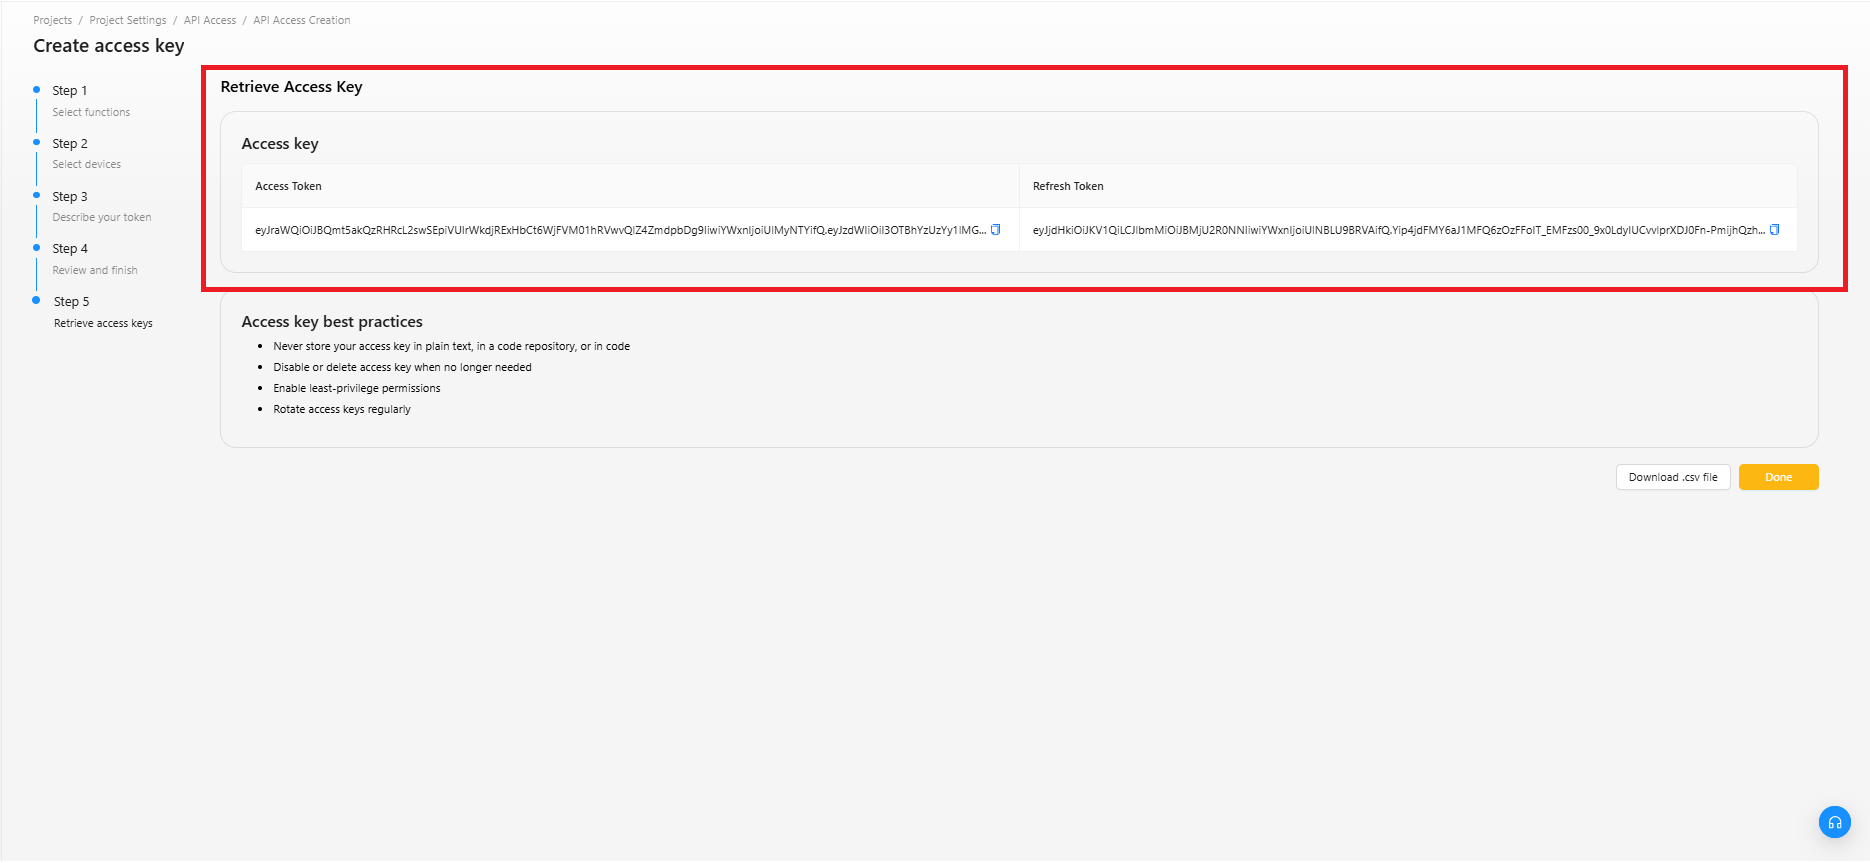
Step 5: Retrieve access keys
Please copy your token below and store it in a safe place.
This is the only time you will be able to view it.
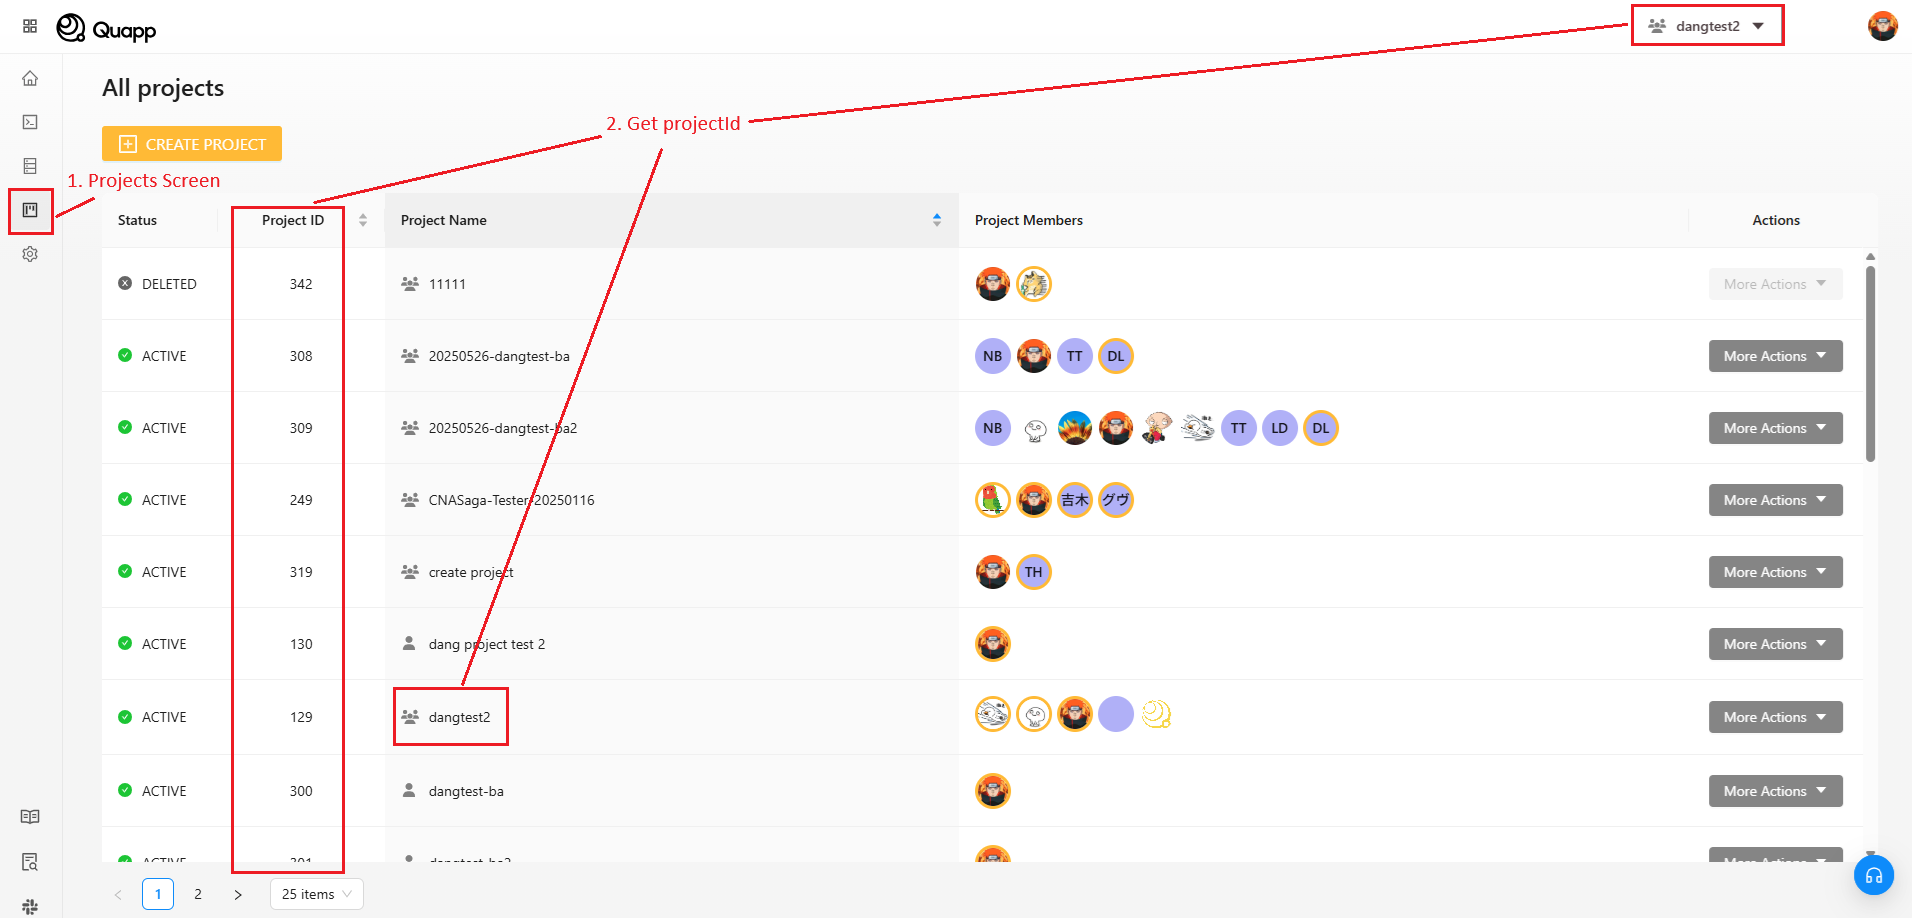
How to get projectId
Log in to your account → select project → go to Project screen
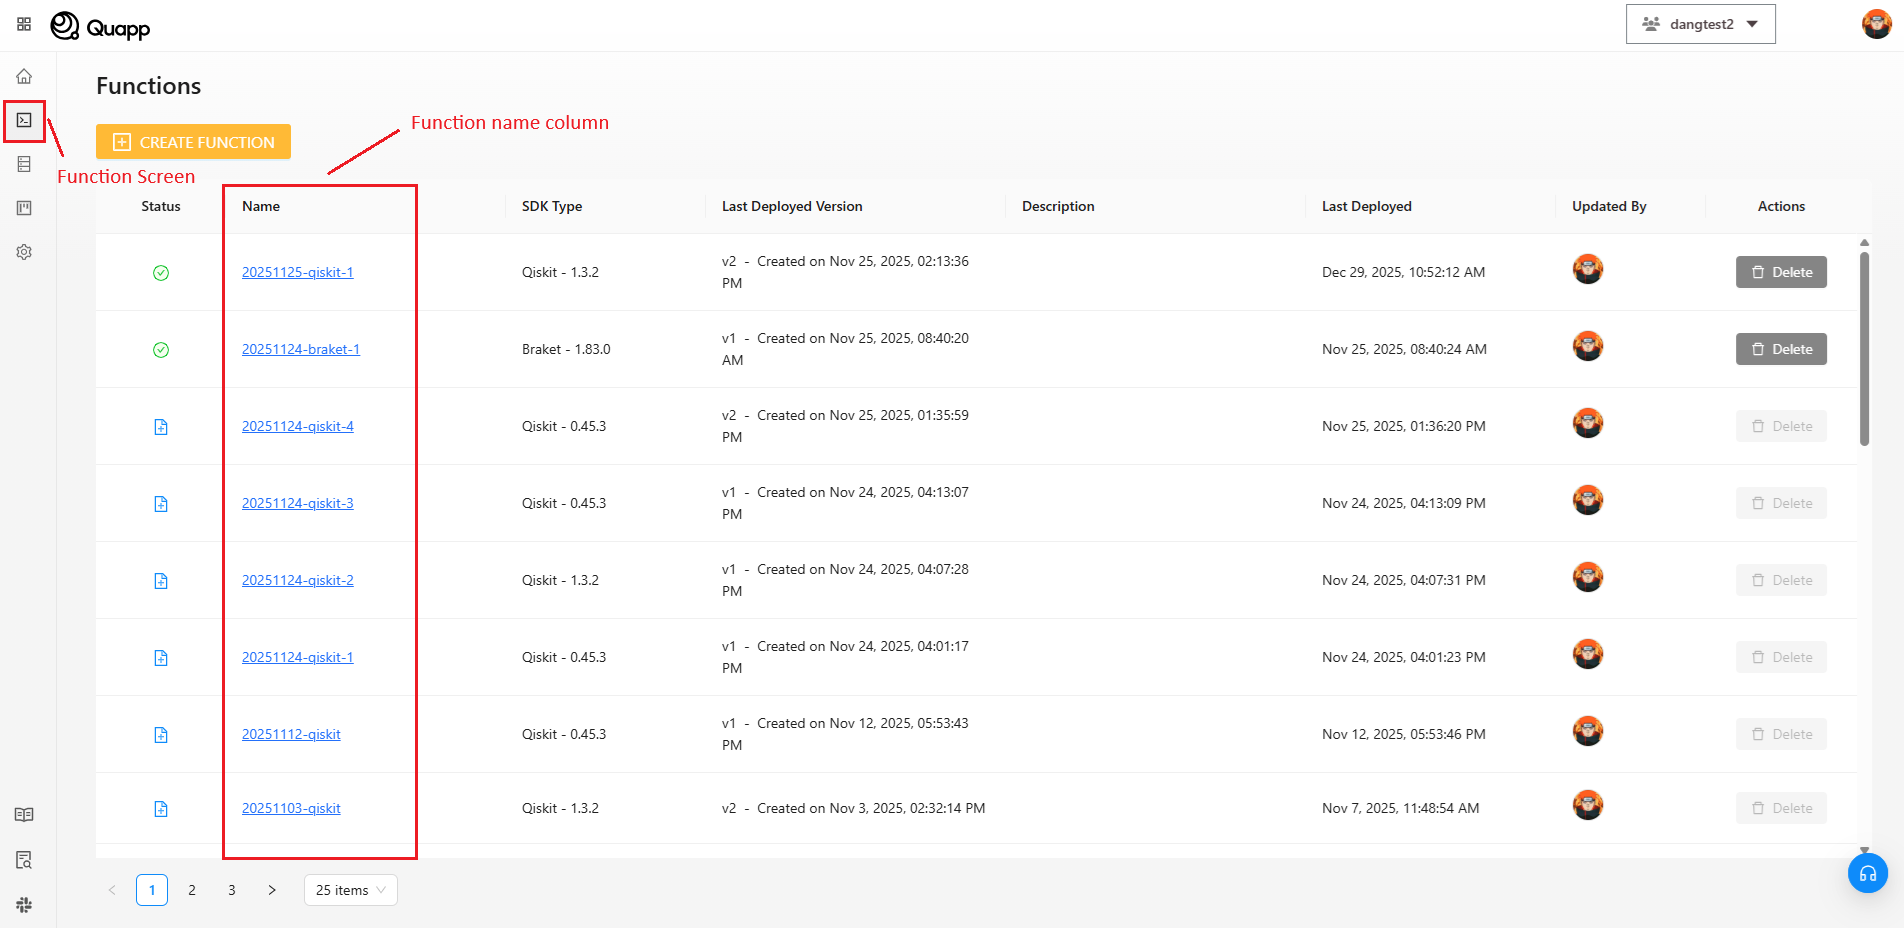
How to get functionName
Log in to your account → select project → go to Functions screen
In the function screen, you can check the function you can check the function name you want to use.
How to get deviceId
Notice: please make sure you have Project admin permission or you are Project Owner. If not, please contact your project admin.
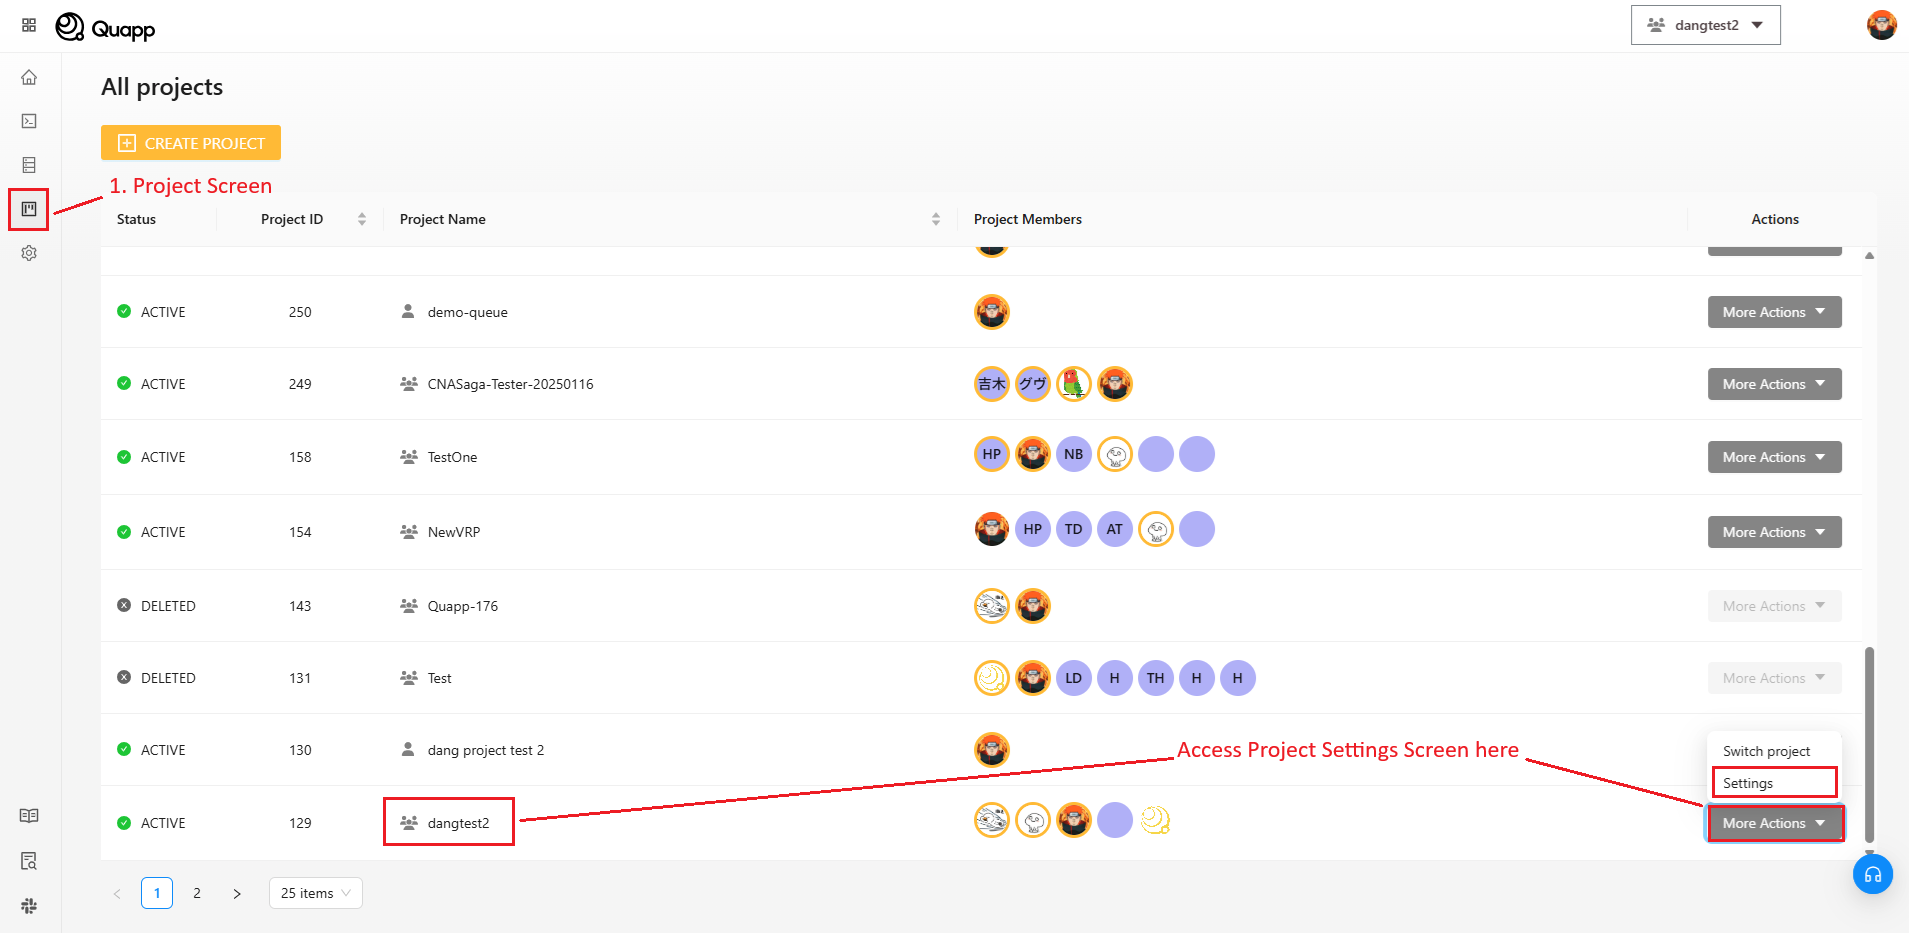
Step 1: Log in to your account → select project → go to Project Screen.
Step 2: In column Actions, select your project → click More Actions → Settings.
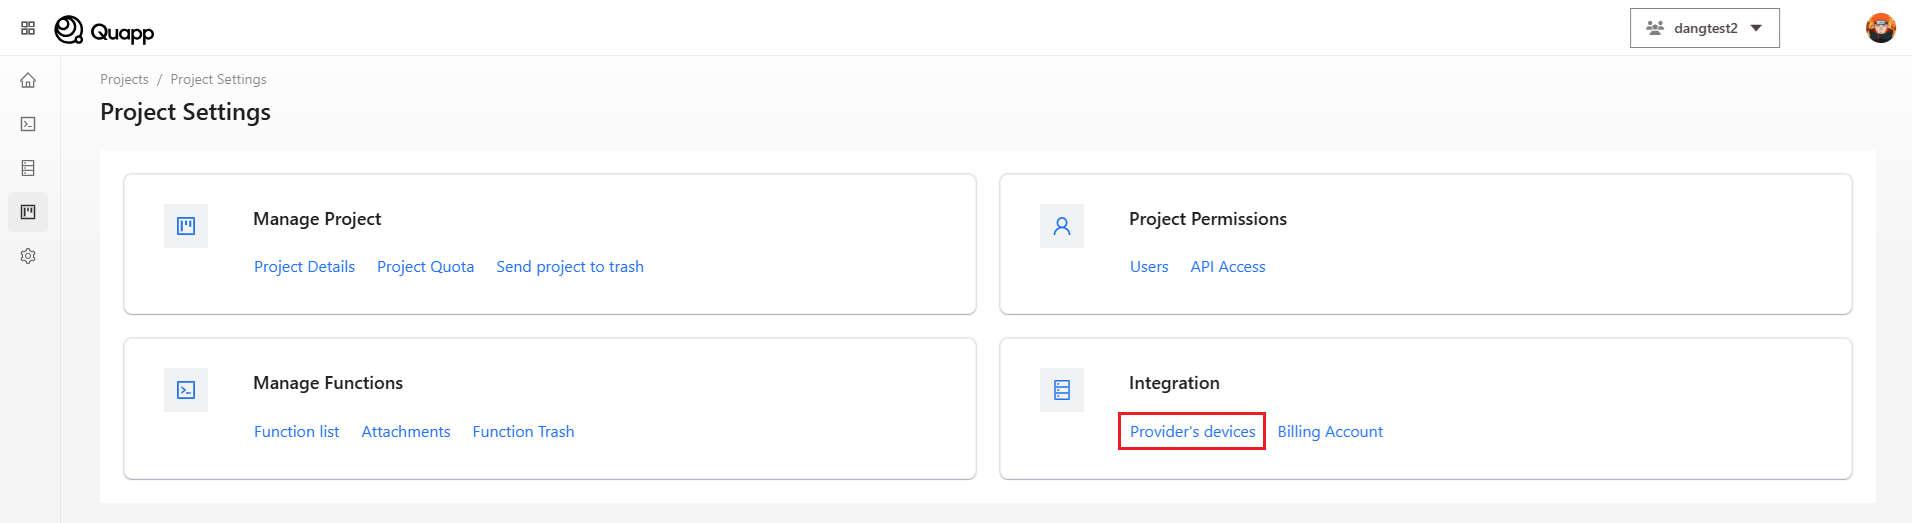
Step 3: On the screen Project Settings → select Provider’s devices.
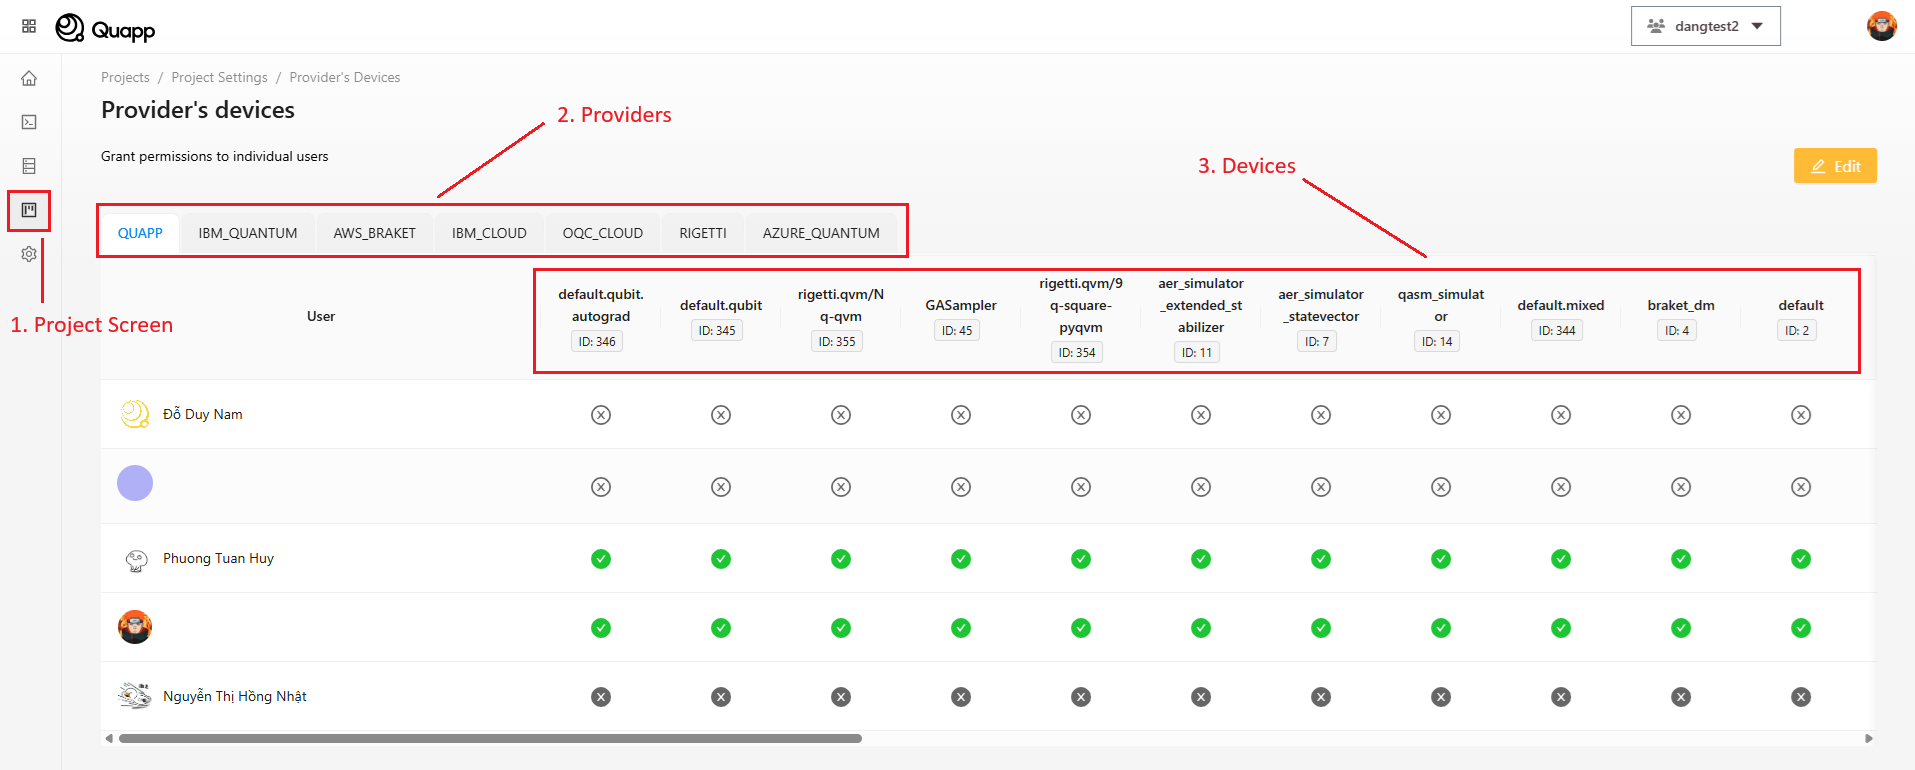
Step 4: On the screen Provider's devices → select the provider you want to use and get the deviceId below it.
How to use access token to invoke
1. Invoke Endpoint
API: /api/v1/third-party/function/invoke
Method: POST
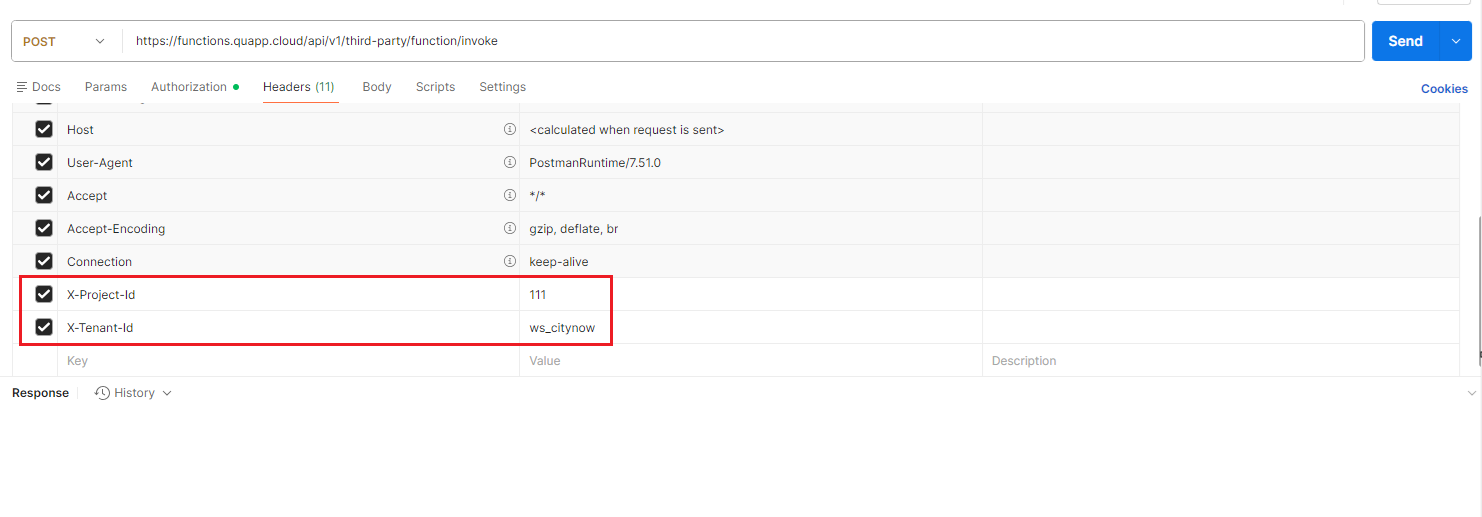
Required Headers:
| Name | Value |
|---|---|
| Authorization | Bearer <token> |
| X-Project-Id | <project ID> |
| X-Tenant-Id | <workspace ID> |
Note: Please contact Customer Success to obtain your
<workspace ID>
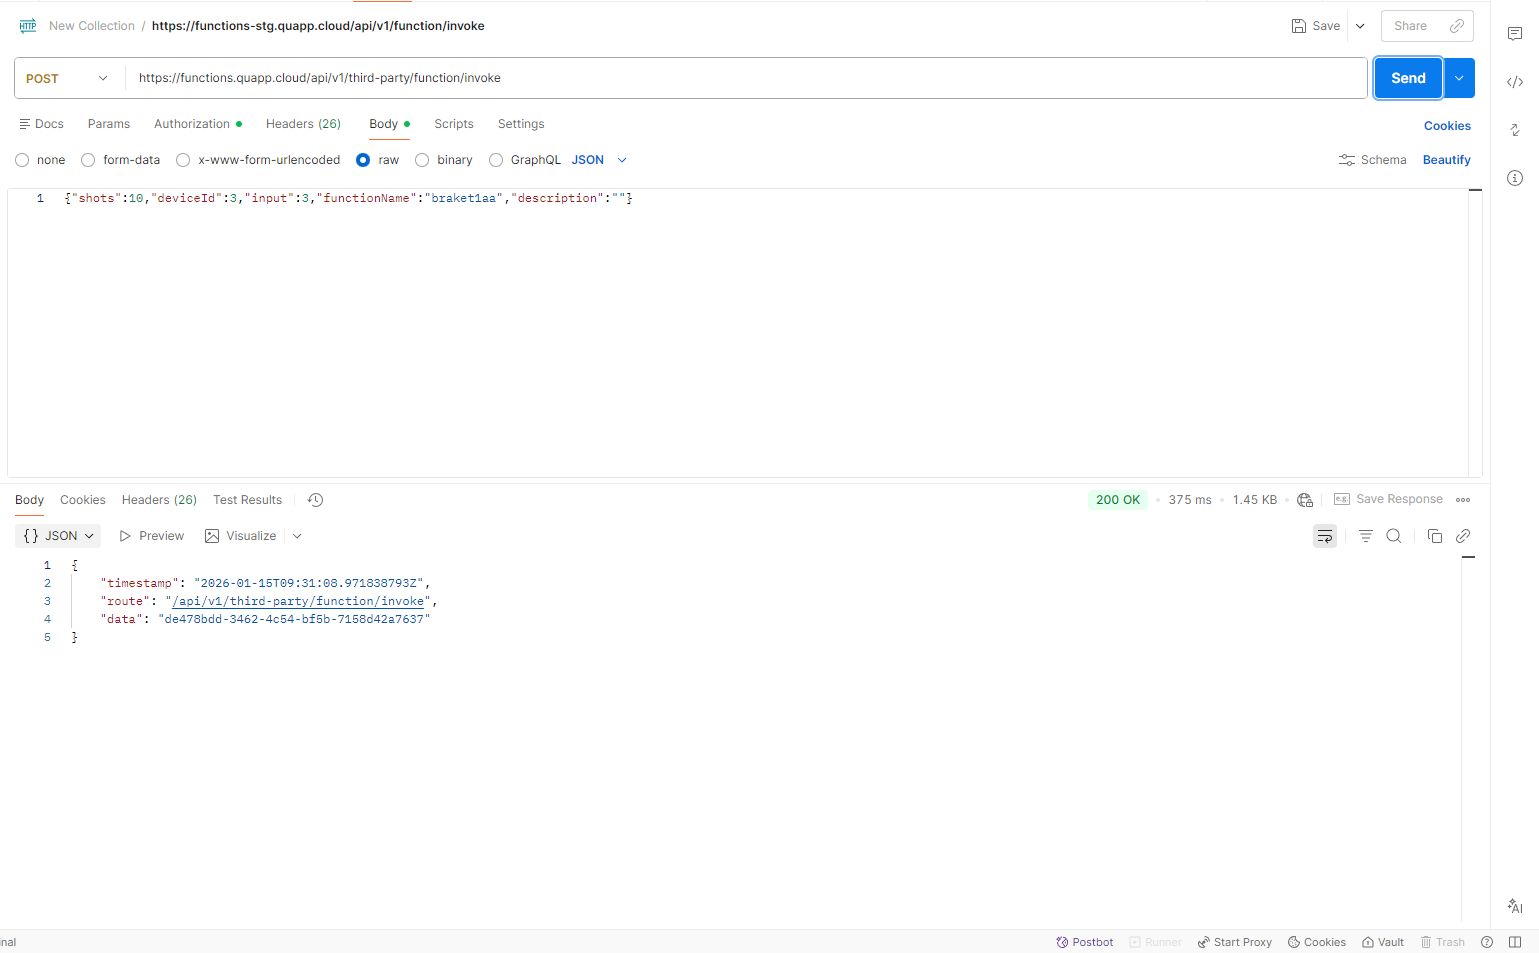
Body:
{
  "functionName": "string",
  "deviceId": 6,
  "description": "string",
  "shots": 10,
  "input": object
}
- functionName: The function you want to invoke.
- deviceId: The ID of the device.
- shots: The number of times you want to run on one circuit.
- input: Your input data.
Response:
{
    "timestamp": "2025-05-16T03:46:53.377798292Z",
    "route": "/api/v1/third-party/function/invoke",
    "data": "664b7e6b-1bae-4bae-bb1e-ea9a62271e08"
}
- data: the job_id, use job_id to fetch job detail.
2. Job detail Endpoint
API: /v1/third-party/jobs/{jobId}/detail
Method: GET
Required Headers:
| Name | Value |
|---|---|
| Authorization | Bearer <token> |
| X-Project-Id | <project ID> |
| X-Tenant-Id | <workspace ID> |
Note: Please contact Customer Success to obtain your
<workspace ID>
Path Variable:
- job_id: the job id
Response:
{
    "timestamp": "",
    "route": "/api/v1/jobs/338650af-5e43-49f5-9ef5-809741b11cbf/detail",
    "data": {
        "id": "338650af-5e43-49f5-9ef5-809741b11cbf",
        "status": "DONE",
        "retry": 3,
        "description": "",
        "createdBy": {
            "id": 22,
            "email": "[email protected]",
            "fullName": "John Doe",
            "avatar": "http://example.com/avatar.png"
        },
        "updatedBy": {
            "id": 22,
            "email": "[email protected]",
            "fullName": "John Doe",
            "avatar": "http://example.com/avatar.png"
        },
        "submitTime": "2025-05-08T02:01:21.875362Z",
        "ranTimestamp": "2025-05-08T02:01:22.494423Z",
        "finishedTimestamp": "2025-05-08T02:01:32.535703Z",
        "device": {
            "id": 423,
            "name": "32q-qvm",
            "type": "QUANTUM_SIMULATOR"
        },
        "function": {
            "id": 824,
            "name": "test-pq",
            "version": 2
        },
        "jobInput": 1,
        "jobResult": {
            "ro": []

        },
        "provider": {
            "id": 5,
            "name": "Quapp"
        },
        "shots": 10,
        "totalCompletionTime": 10041,
        "circuitImageUrl": "http://example.com/avatar.png",
        "histogram": {
            "0": 6,
            "1": 4
        },
        "processor": "GPU",
        "circuitFileContentType": "image/svg+xml",
        "executionTime": 4243.2909,
        "isOwner": true
    }
}
Job Status Reference
Jobs executed via API follow the same status model as jobs submitted from the UI:
- NEW – The job has been created but not yet processed.
- INITIALIZING – The system is initializing resources required to execute the job.
- IN_QUEUE – The job is waiting in the queue to be processed.
- RUNNING – The job is currently being executed.
- DONE – The job has completed successfully.
- ERROR – An error occurred during the job execution.
- IN_DEAD_LETTER_QUEUE – The job failed multiple times and was moved to the dead-letter queue.
This unified model ensures consistency across UI and API usage.
3. Invoke with Postman
- Open Postman and add token.
Select method POST and enter the Quapp platform invoke API endpoint.
Then select Authorization tab (1.)> choose auth type Bearer Token (2.)> Enter your bearer token (3.)
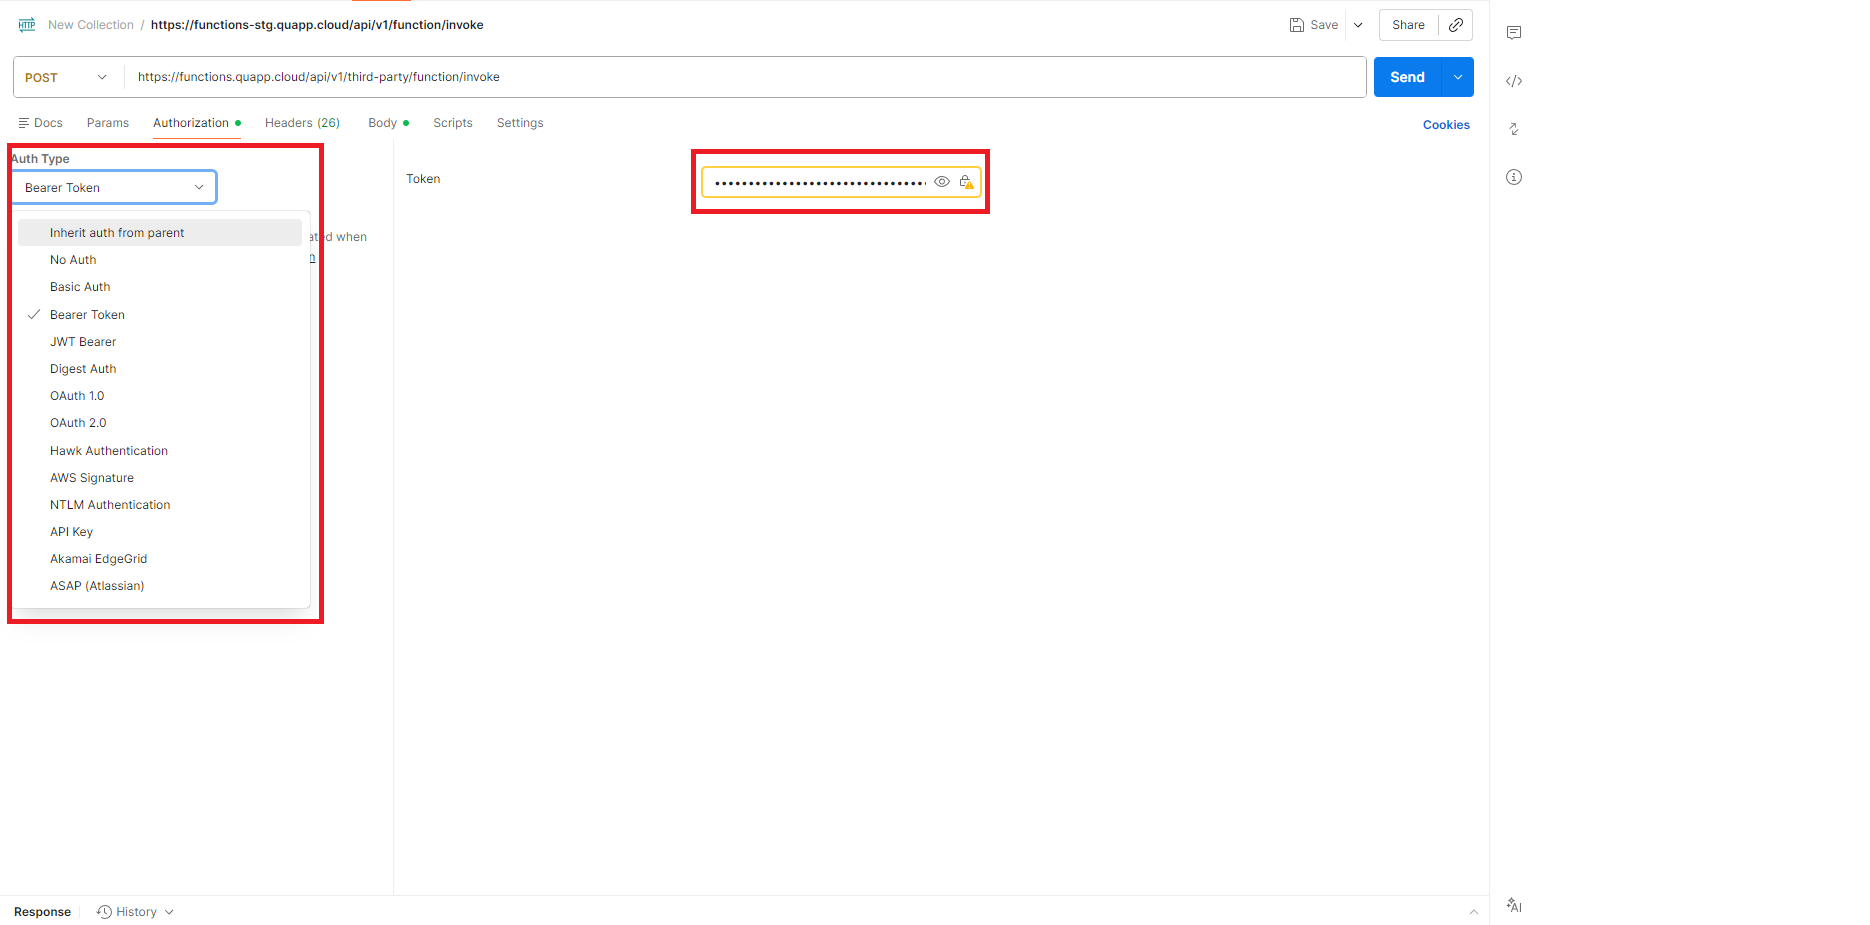
- Switch to headers tab and add the required header.
- Switch to body tab, choose raw > enter your request data > send request
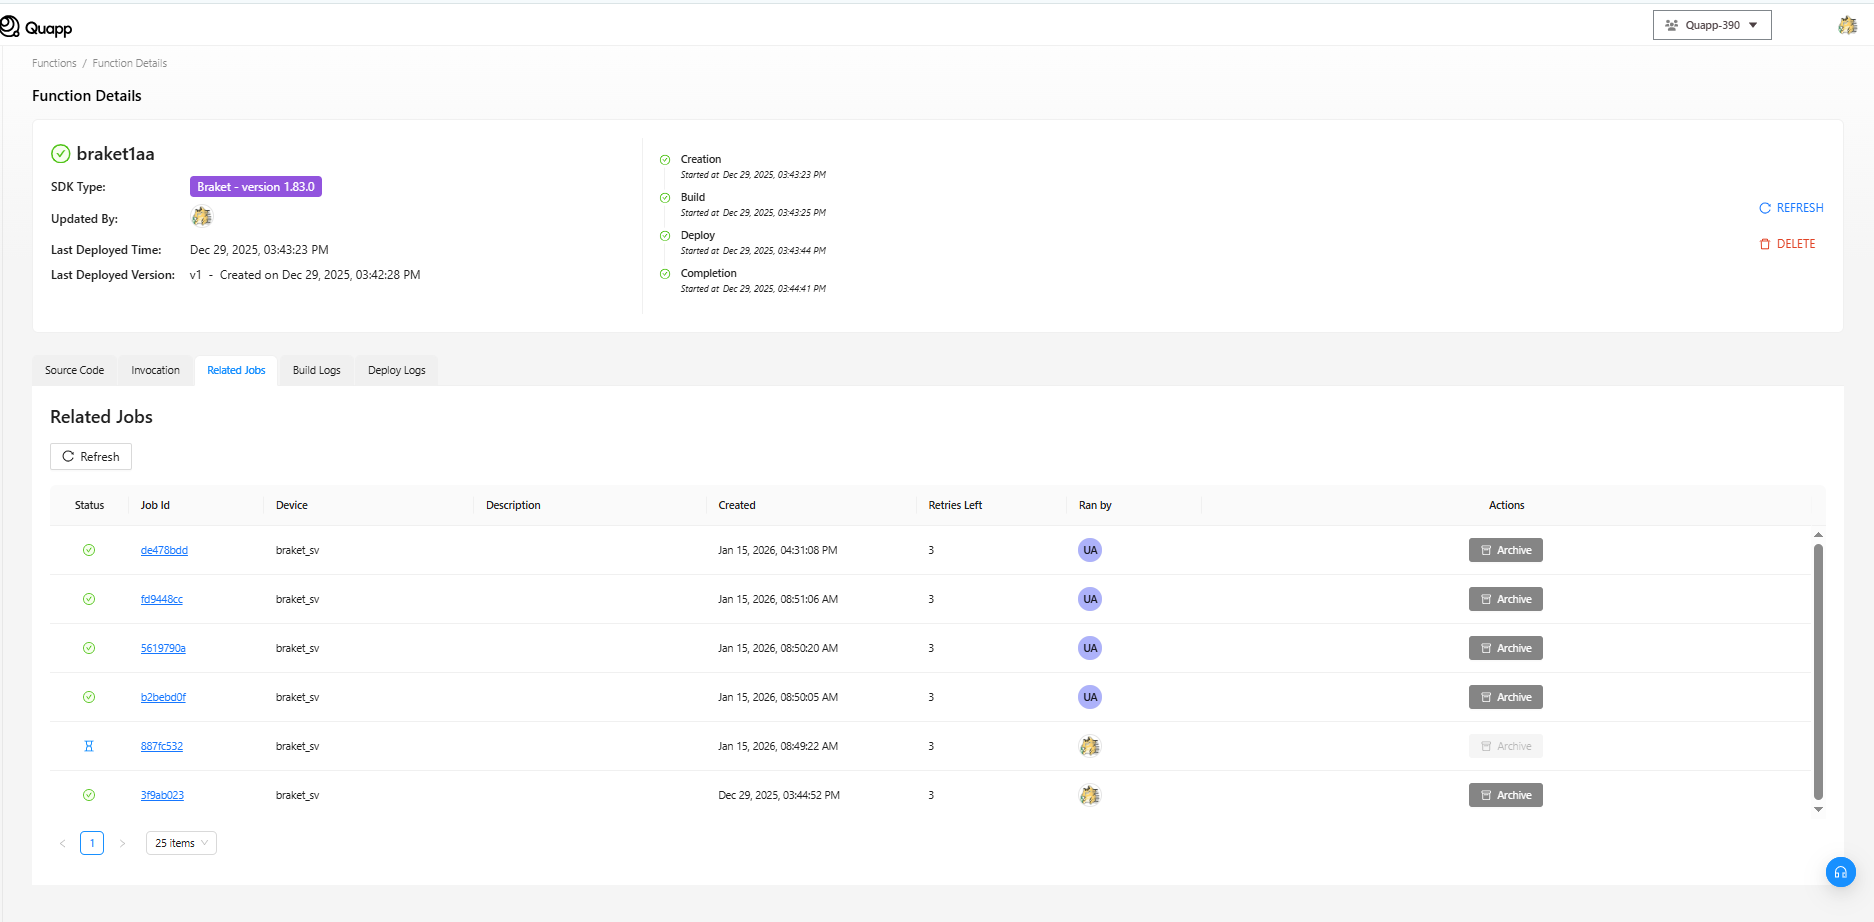
- Refresh the job screen to see the job that you just invoked.

4. Rate limiter
The current rate limit for API invocation is 3 requests per 10 seconds per token.
If this limit is exceeded, the API will respond with the following error:
- HTTP Status:
429 Too Many Requests - Response Body:
{
    "timestamp": "2025-05-16T04:19:16.600818508Z",
    "route": "/api/v1/third-party/function/invoke",
    "errors": [
        {
            "code": "000013",
            "message": "Too many requests. Please try again later."
        }
    ]
}
Clients should implement retry logic with exponential backoff or respect the rate limit to avoid being throttled.
Refresh Token Usage Guide
1. Purpose
This endpoint is used to refresh the Access Token and ID Token when the current tokens have expired or are about to expire.
The client sends a refreshToken to receive a new set of tokens.
2. Endpoint
POST /v2/tokens/refresh
Description: Refreshes the tokens using a valid Refresh Token.
3. Headers
| Key | Value |
|---|---|
| Content-Type | application/json |
| Authorization | Not required |
4. Request Body
{
  "refreshToken": "string"
}
Explanation:
- refreshToken: The refresh token string that the user receives when generating the API Access Token.
5. Sample Response (200 OK)
{
  "downloadId": "string",
  "idToken": "string",
  "accessToken": "string",
  "tokenType": "string",
  "expiresIn": 0,
  "refreshToken": "string"
}
| Field | Description |
|---|---|
| accessToken | The new token used for calling APIs. |
| tokenType | The token type (e.g., Bearer). |
| expiresIn | Number of seconds before the access token expires. |
| refreshToken | A newly issued refresh token (this replaces the previous one). |
| idToken | The token containing identity information (claims) like name, email, and login time. |
| downloadId | The ID used for downloading the CSV file. |
Note: A new refresh token is issued every time this endpoint is called — the client must always store the latest refresh token.
Security Best Practices
When using API Access Tokens, Quapp recommends:
- Assigning tokens only to required functions
- Setting expiration dates whenever possible
- Rotating tokens periodically
- Storing tokens securely (environment variables or secret managers)
- Revoking unused or compromised tokens immediately
When to Use API Access Tokens
API Access Tokens are ideal for:
- Backend services invoking quantum functions
- Automated workflows and pipelines
- Integration with external platforms
- Scheduled or batch execution of quantum jobs
They are not intended for end-user interactive access, which should continue to use the Quapp web interface.