Create Function
Accessing the Function Creation Page
- From the left sidebar, select Functions.
- On the Functions page, click Create Function to open the function creation wizard.
The function creation process consists of five steps:
- Basic Info
- Choose Method
- Choose Template
- Review Code
- Deploy
Step 1: Basic Info
Provide the basic information required to create a function.
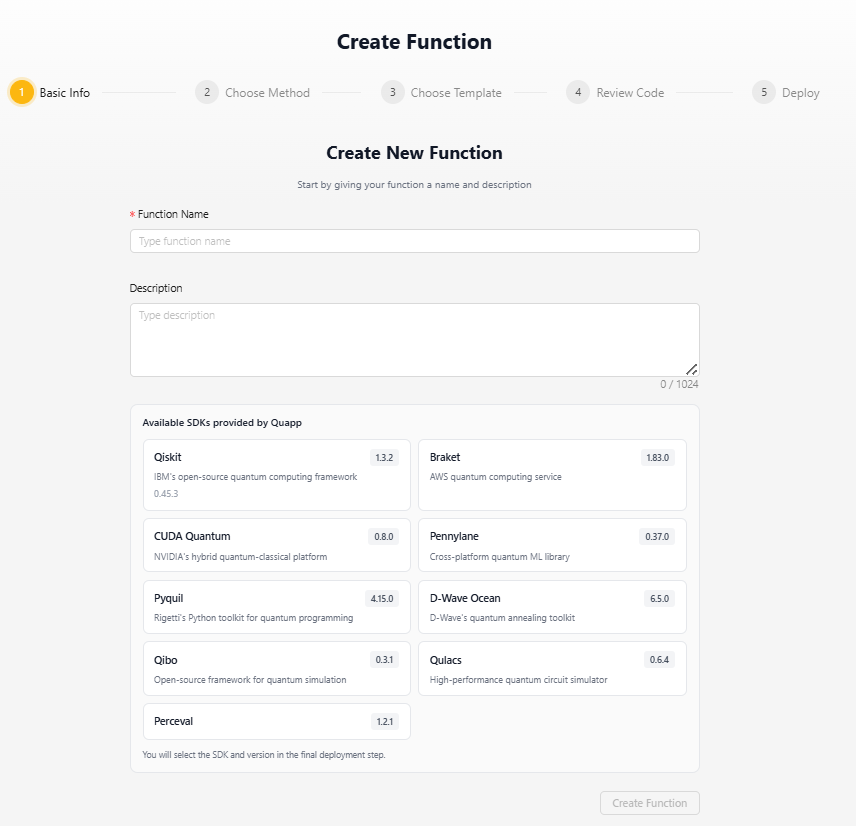
Function Name
Enter a unique name for the function.
Validation rules:
- Allowed characters: lowercase letters (a–z), numbers (0–9), and hyphens (-)
- Spaces are not allowed
- Minimum length: 2 characters
- Function names must be unique within the project
If the name is invalid or already exists, an error message is displayed.
Description (Optional)
Provide a short description to help identify the purpose of the function.
Available SDKs
The page displays all SDKs currently supported by Quapp, including their available versions.
Examples:
- Qiskit
- Braket
- PennyLane
- PyQuil
- Qibo
- Qulacs
- Perceval
Notes:
- SDK cards are displayed for reference only.
- SDK selection is not performed in this step.
- The SDK and SDK version will be selected during deployment (Step 5).
After entering the required information, click Create Function to proceed to the next step.
Step 2: Choose Method
Select how to begin creating the function.
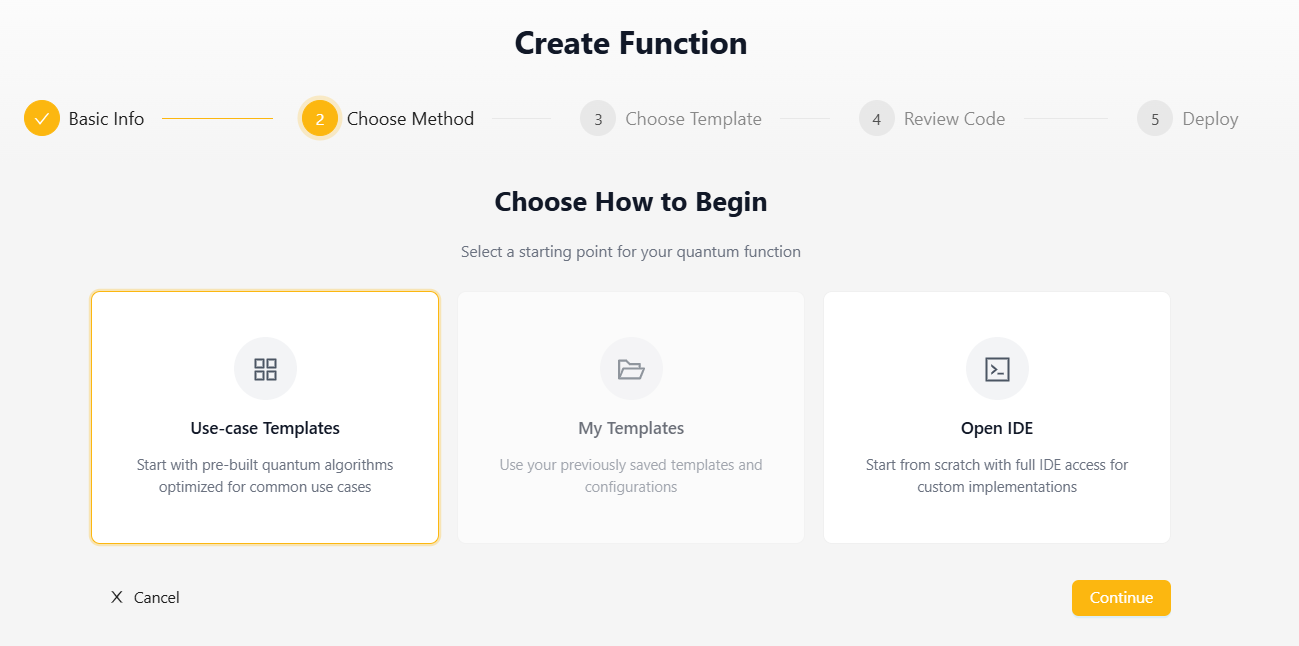
Available options:
Use-case Templates
Start from pre-built quantum algorithm templates optimized for common use cases.
My Templates
Start from a template previously saved by the user.
Open IDE
Create the function from scratch using the integrated IDE environment.
Step 3: Choose Template
This step is displayed when Use-case Templates is selected in Step 2.
Choose a predefined quantum algorithm template and configure its parameters.
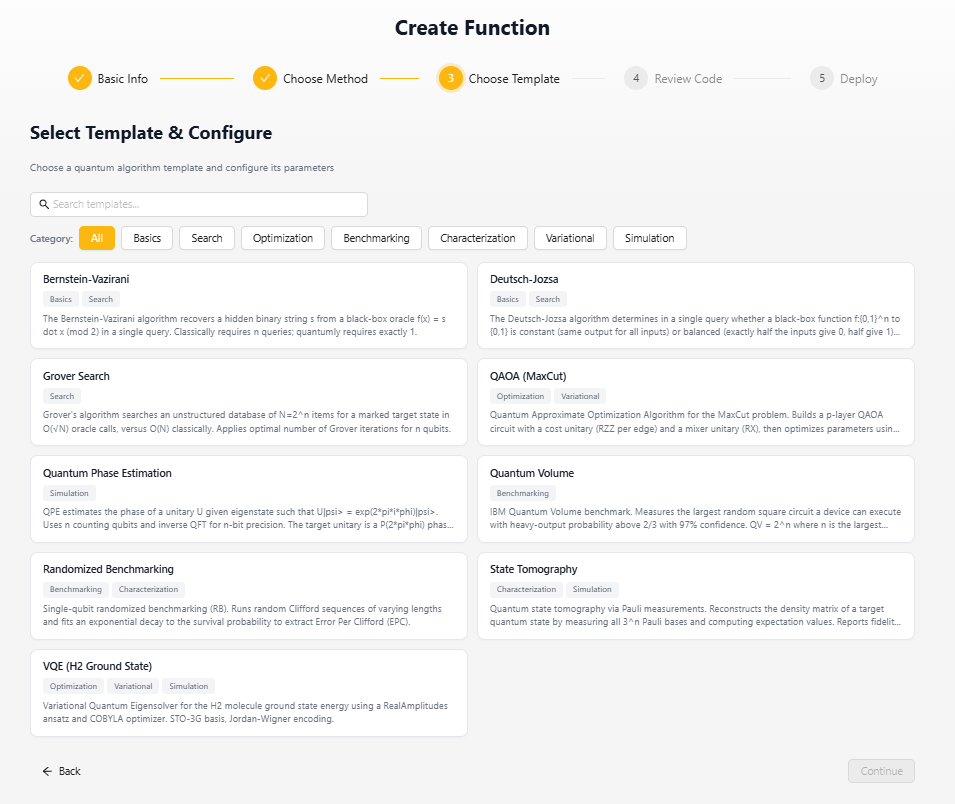
Available categories may include:
- Basics
- Search
- Optimization
- Benchmarking
- Characterization
- Variational
- Simulation
Example templates:
- Bernstein-Vazirani
- Deutsch-Jozsa
- Grover Search
- QAOA (MaxCut)
- Quantum Phase Estimation
- Quantum Volume
- Randomized Benchmarking
- State Tomography
- VQE (H2 Ground State)
Navigation
Users can return to Step 2 and modify their selections before entering the code review stage.
Step 4: Review Code
Review and edit the function source code before deployment.
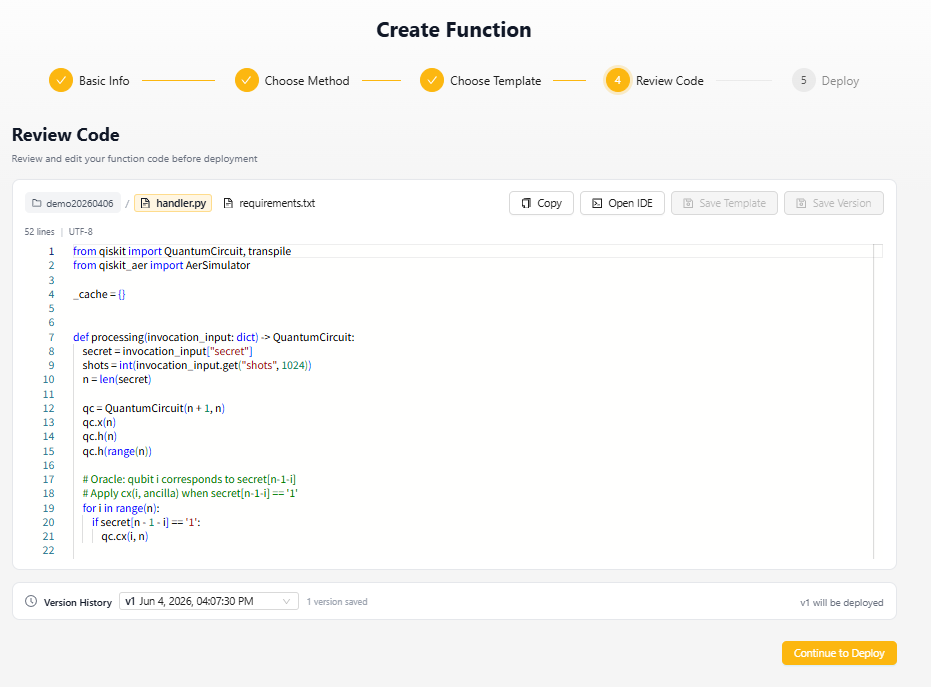
The editor supports the following files:
handler.py
Contains the function implementation.
The file must contain the required function definitions described in the Developer Guide.
requirements.txt
Used to declare external Python dependencies.
Each dependency should be listed on a separate line using standard requirements.txt syntax.
Additional Files
Users may upload Python files from their local environment.
Uploaded files:
- Do not replace handler.py
- Can be imported and used by handler.py
- Are available in the function runtime environment
Version History
The editor includes a Version History section for managing saved code versions.
Save Version
The Save Version button becomes available only when code changes are detected.
When a version is saved:
- A new code version is created
- The version is added to Version History
- Previous versions remain available for selection
Navigation
Once the user enters Step 4, navigation to previous wizard steps is disabled.
The user can only:
- Continue to Step 5 (Deploy)
- Return from Step 5 back to Step 4
This behavior ensures consistency between the selected template and the generated source code.
Step 5: Deploy
Review deployment settings before deploying the function.
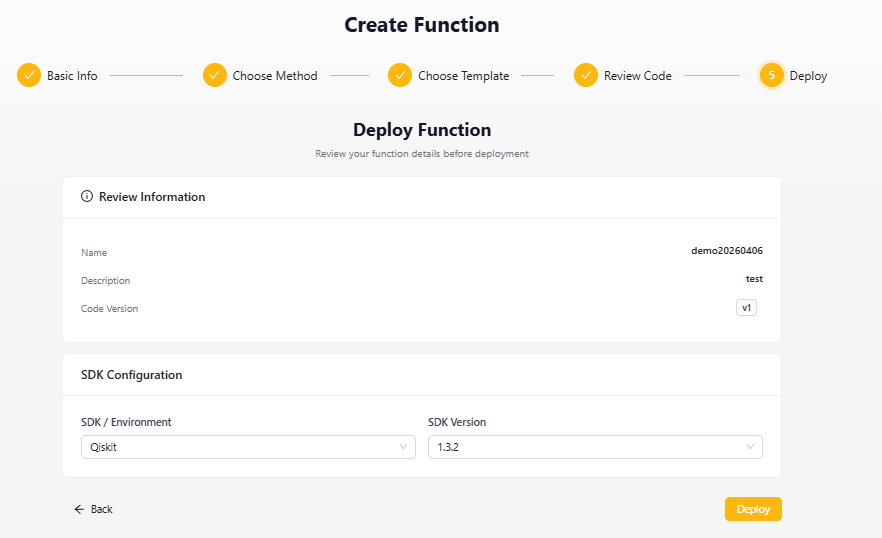
SDK Configuration
Select:
- SDK / Environment
- SDK Version
The available options depend on the SDKs supported by Quapp.
Deployment
Click Deploy to deploy the function.
After successful deployment:
- The system returns to the Functions page
- The newly created function appears in the function list
- The function becomes available for invocation and job execution
Navigation
Users may return to Step 4 to modify the source code before deployment.
However, Steps 1–3 are no longer accessible once the function reaches the deployment stage.
Notes
- Templates cannot be changed after deployment.
- Save Version is displayed only when code modifications are detected.
- All required dependencies should be declared before deployment.
- SDK selection is performed during deployment, not during function creation.
- Users may move freely between Steps 2–3 before entering Step 4.
- After entering Step 4, only Step 4 and Step 5 are accessible.
Result After Deploying a Function
After deployment is completed successfully, the system automatically redirects to the Functions page.
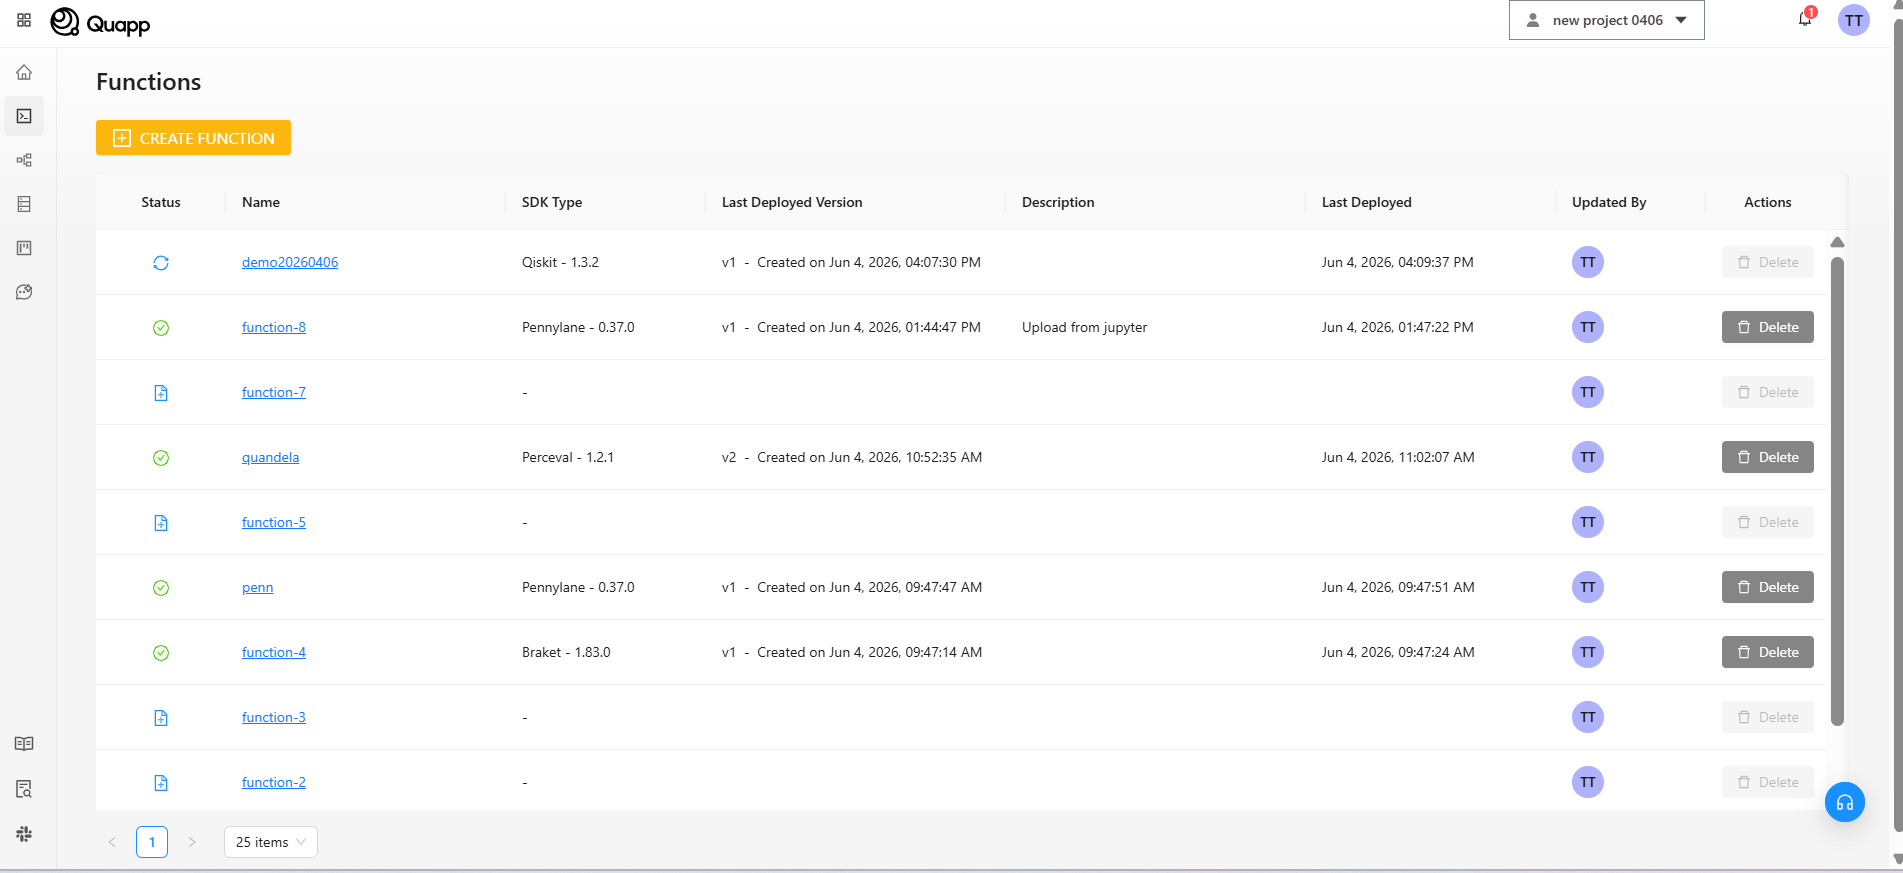
The Functions page displays:
- Function Name
- Current Version
- Deployment Status
- Creation Time
- Related Function Information
The newly deployed function appears at the top of the list and is ready for use.